Hand-Turned Wood Pens: Kits, Wood, Finish, Selling
Been having lots of fun trying out different pen kits, wood species, and finishes. Pen turning is one of the best entry points on the lathe — blanks are small, setup is quick, and you walk away with a finished, functional object in an hour or two. That tight feedback loop makes it easy to experiment with a new wood species or try a different finish without committing a whole afternoon.
Kits and Styles
There are a surprising number of pen kit styles available. I’ve been working with slimline kits most — the proportions are clean and they’re forgiving for a beginner. I’ve also tried European-style and cigar kits, which have a heftier feel in the hand. Hardware comes in chrome, gold, gunmetal, and antique brass, and the metal finish matters as much as the wood when it comes to the overall look of the finished pen.
I’ve been ordering from Penn State Industries and have been happy with the quality. Good starting points are the 8 Slimline Pro Click Pen Kit Starter Set — which gives you enough kits to experiment across a few different wood blanks — and the 3 Slimline Pro EDC Pen Kit Starter Set if you want a smaller initial investment. The EDC style is slightly chunkier and feels more substantial in the hand, which some people prefer.
What You’ll Also Need
Beyond the kits and blanks, two pieces of tooling make pen turning much easier. A pen mandrel holds the blank on the lathe while you turn it — I use the #2 MT Pen Mandrel Saver Package, which includes the mandrel saver that protects your mandrel from excessive pressure and extends its life considerably. The other essential is a pen press for assembly and disassembly — pressing components in by hand or with a clamp usually ends in a cracked blank or misaligned parts.
Working in Batches
Once you have the workflow down, pens lend themselves well to a mini production line. I’ll typically prep 6–10 blanks at a time rather than turning one pen start to finish before moving to the next. The key step that requires planning ahead is gluing the brass tubes into the blanks — the epoxy or CA used to set the tubes needs to cure fully before you can drill and turn, so that prep happens the day before. With tubes already set, you can move through a batch efficiently: drill all blanks, mount and turn the first barrel, then the second, sand through the grits, apply finish, and move to the next. Assembly all happens at the end with the pen press. Six to ten pens in an afternoon is realistic once the process is familiar.
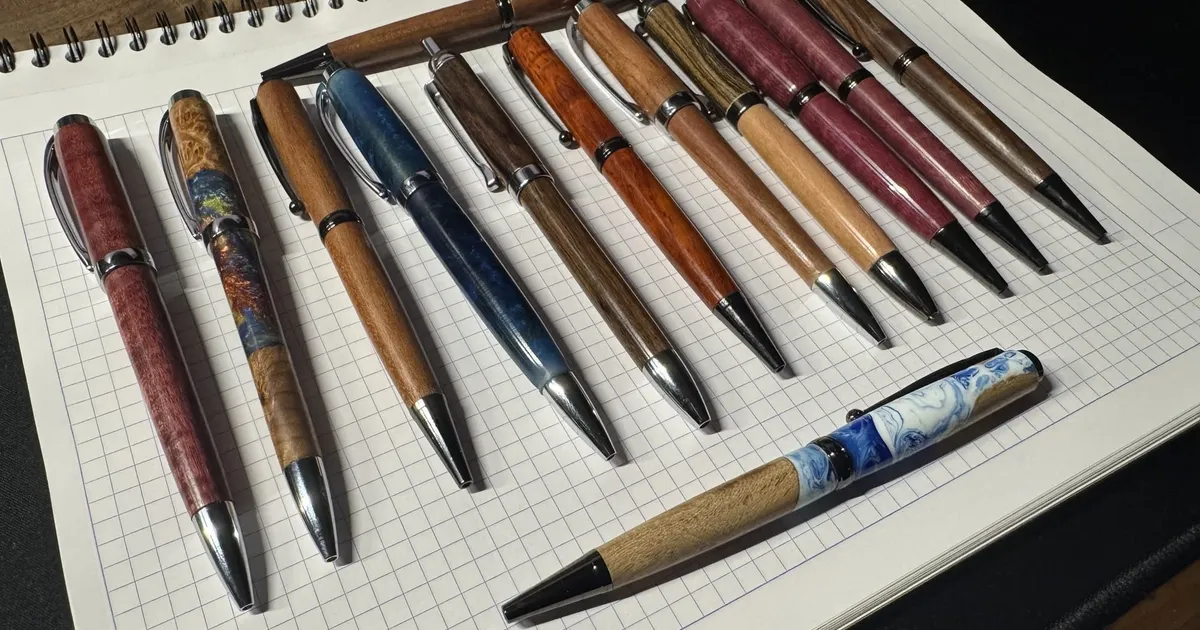
Choosing the Wood
Dense, stable species work best. Cherry, walnut, and hard maple are reliable standbys that finish beautifully. I’ve also had good results with some exotics — purpleheart produces an almost unreal purple straight off the lathe (it fades to brown over time with UV exposure, which some people love), and padauk is a deep rust-orange that’s impossible to ignore. Figured material like ambrosia maple or burl is especially striking at pen scale; the small format actually shows off character grain better than a large bowl does.
Finishing
CA glue is my go-to finish for pens. Applied in thin coats directly on the lathe, it cures rock-hard and glass-smooth and holds up well to daily carry — far better than oil or wax on something that’s going to live in a pocket or bag. I use this CA glue (affiliate link) — thin viscosity works best for pen finishing since it levels well and doesn’t build up unevenly. The key to a good CA finish is thin coats, good accelerator, and patience between layers.
The step that makes the difference is polishing. After the final CA coat has cured, I work through a set of micro mesh sanding pads — starting around 1500 grit and going up through 12000 — which cuts back any haze or unevenness and brings the finish to a high gloss. The pads I use are these micro mesh pads on Amazon (affiliate link). They last a long time and work on CA finishes on bowls and other projects too, not just pens. The difference between stopping at sandpaper and going through the full micro mesh progression is significant — you go from a nice finish to something that looks like glass.
Why They Make Great Gifts
Handmade pens hit a sweet spot — functional, clearly handmade, and easy to tailor to someone’s taste in wood tone or hardware finish. No two blanks turn out identically, so every pen is genuinely one of a kind. They’re the kind of thing people actually use every day rather than setting on a shelf.
Pens as a Sellable Item
If you’re selling your work, pens are worth taking seriously as a product. The internal hardware for a slimline kit runs roughly $2–4 per pen when bought in the quantities the starter sets offer, and a decent wood blank adds another dollar or two. A finished handmade pen in a nice wood — walnut, cherry, or something figured — sells comfortably for $10–15 at craft fairs, local shops, or online. That’s a reasonable margin for an hour of work including turning, finishing, and assembly.
The bigger advantage is volume. A bowl takes several hours from rough blank to finished piece and sells for $50–300 depending on size and wood. A pen takes a fraction of the time and sells for less, but you can turn several in an afternoon and they’re easy to display, easy to ship, and easy for people to buy on impulse. For someone building a product mix, pens fill the lower price tier and give customers a way to buy something handmade without the commitment of a larger piece.
Interested in a custom piece with similar character?
I take a limited number of commissions each month to ensure every piece receives the attention it deserves. Let's discuss your custom commission